Creative Christmas Cookie Decorating Ideas: Recipes, Tips, and Inspiration
Discover the ultimate guide to baking and decorating festive Christmas cookies that taste as amazing as they look! From a simple, fail-proof cookie recipe to creative decorating ideas for every skill level, this post has everything you need to elevate your holiday baking. Learn essential techniques, explore traditional and modern designs, and get inspired by tips on using edible decorations, royal icing, and minimalist styles like monochromatic elegance with gold accents. Whether you’re a seasoned baker or a beginner, these ideas will help you create beautiful, delicious cookies that will wow your family and friends this Christmas!
GARDEN & RECIPES
Jennifer Miller
11/24/20244 min read

Creative Christmas Cookie Decorating Ideas: A Recipe for Festive Fun
The holiday season is the perfect time to unleash your inner cookie artist. Create festive treats that taste delicious and look stunning. Whether you're a seasoned baker or a novice, this guide has you covered.
In this post, you’ll find a tried-and-true Christmas cookie recipe, essential decorating tools, and inspiring ideas to transform your humble holiday cookies into edible works of art. Let’s dive in!
Christmas Cookie Recipe
Ingredients
For the cookies:
2 ½ cups all-purpose flour
1 teaspoon baking powder
½ teaspoon salt
¾ cup unsalted butter, softened
1 cup granulated sugar
1 large egg
2 teaspoons vanilla extract
1 tablespoon milk
For the icing (optional):
2 cups powdered sugar
2-3 tablespoons milk
1 teaspoon vanilla extract
Food coloring (optional)
Instructions
Step 1: Prepare Your Ingredients
Preheat your oven to 350°F (175°C) and line baking sheets with parchment paper or silicone mats. Soften the butter for easier mixing.
Step 2: Mix Dry Ingredients
In a medium bowl, whisk together flour, baking powder, and salt.
Step 3: Cream Butter and Sugar
Beat softened butter and sugar until fluffy. Add the egg, vanilla, and milk, mixing until well combined.
Step 4: Combine Wet and Dry Ingredients
Gradually add the dry ingredients to the wet mixture until a soft dough forms.
Step 5: Chill the Dough
Wrap the dough in plastic and refrigerate for at least 1 hour to prevent spreading during baking.
Step 6: Roll and Cut
On a floured surface, roll the dough to ¼-inch thickness. Use holiday-themed cookie cutters to shape your cookies. Place them on prepared baking sheets.
Step 7: Bake
Bake for 8-10 minutes or until the edges are lightly golden. Let cool completely before decorating.
Essential Tools and Supplies for Decorating
To make your cookies look amazing, you need the right tools:
Piping bags and various tips for intricate designs
Offset spatula for smooth icing application
Food coloring gels for vibrant hues
Toothpicks for detailed patterns
Sprinkles, edible glitter, and candy decorations
Understanding icings helps, too:
Royal Icing: Smooth and glossy, perfect for detailed piping.
Buttercream: Rich and creamy for spreading or simple piping.
Glaze: A shiny finish ideal for dipping or coating.
Creative Christmas Cookie Decorating Ideas
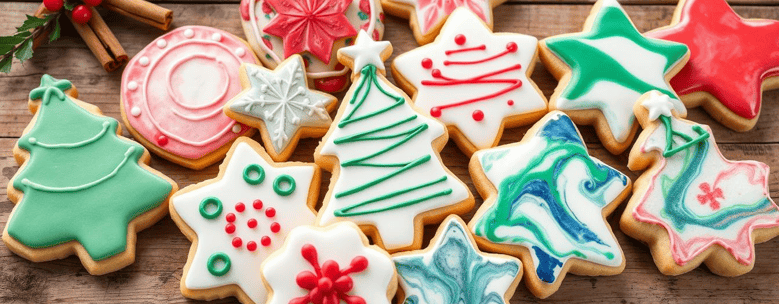
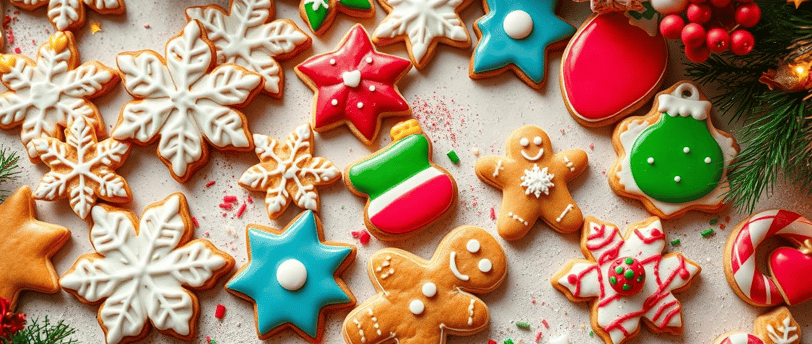
Traditional Christmas Designs
Gingerbread Men: Add faces, buttons, and scarves with royal icing.
Christmas Trees: Use green icing and decorate with mini candies as ornaments.
Festive Wreaths: Create circular cookies with red and green icing, adding edible glitter for sparkle.
Modern Minimalist Styles
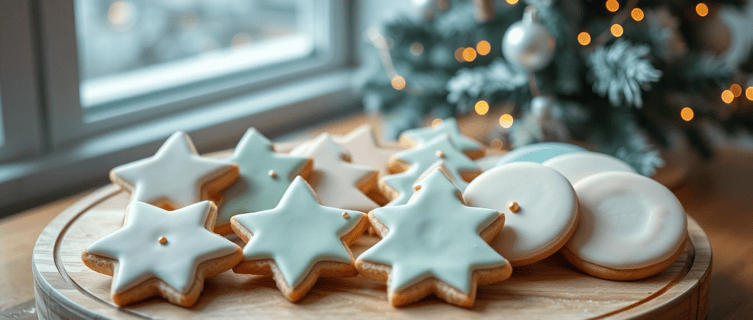
Monochromatic Elegance: Use one color (like white) with gold accents for a chic look.
How to Achieve Monochromatic Elegance in Christmas Cookies
Monochromatic designs are a sophisticated and modern way to decorate Christmas cookies. Here's a simple guide to creating cookies that exude elegance with a single color and gold accents:
Step 1: Choose Your Base Color
Opt for a monochromatic shade, such as white, for a clean and timeless look. Prepare royal icing in your chosen color and ensure it’s the right consistency for smooth flooding.
Step 2: Outline and Flood the Cookies
Use a piping bag with a fine tip to outline the cookie shape with royal icing.
Flood the inside of the outline with the same icing, using a toothpick to spread it evenly and eliminate bubbles.
Let the base layer dry completely, ideally for a few hours or overnight, to ensure a smooth surface.
Step 3: Add Gold Accents
Use edible gold paint or luster dust mixed with a drop of clear alcohol (like vodka) or lemon extract.
With a fine-tipped brush, paint delicate accents, such as edges, dots, or geometric patterns. For a festive touch, outline stars, trees, or snowflakes in gold.
Step 4: Embellish with Edible Pearls or Glitter
Place tiny edible pearls or gold sugar beads strategically for added texture and charm.
Lightly dust the cookie with edible gold glitter for a subtle sparkle.
Step 5: Let It Dry and Shine
Allow your designs to set completely before handling or packaging. The gold accents will catch the light, making your cookies look chic and polished.
This technique is perfect for gifting or displaying as part of a holiday dessert spread. The minimalist yet glamorous design is sure to impress!
Geometric Patterns: Add clean lines and shapes for a fresh, contemporary vibe.
Natural and Edible Decorations
Add dried fruits like cranberries or apricots for rustic charm.
Sprinkle edible glitter or pearls for glamour.
Use natural food coloring made from beet juice or turmeric for earthy hues.
Fun Ideas for Beginners
Sprinkle holiday-themed shapes or sugar over wet icing for quick decorations.
Use basic piping techniques like zigzags or swirls.
Let kids have fun with crushed candies, marshmallows, and stencils.
Advanced Decorating Techniques
For a polished look, try these techniques:
Flooding and Outlining: Achieve smooth, glossy surfaces with royal icing.
Wet-on-Wet Designs: Layer colors to create marbled or watercolor effects.
Textures and Patterns: Add dimension with stencils or piped details.
Storing and Packaging Decorated Cookies
Keep your decorated cookies fresh and festive:
Store in airtight containers with parchment paper between layers.
Package as gifts in cookie tins or cellophane bags tied with festive ribbons.
For travel, wrap cookies in tissue paper and use sturdy containers.
Conclusion
Decorating Christmas cookies is more than just a holiday tradition—it's a chance to unleash your creativity and share joy with loved ones. Whether you stick to classic designs or experiment with modern styles, your cookies are sure to impress.
So, grab your ingredients, tools, and a touch of holiday spirit. Get ready to bake, decorate, and enjoy the festive fun. Happy baking!